Debugging bluetooth keyboard – arrow up and down

Open the Notes app and type in a few lines of text. You must have more than one line of text. Type in a paragraph.

Then press in one of the middle lines of text so you can see the cursor.

Then press the footswitch. The cursor should move up and down between lines. If it doesn’t, then the pedal is not set to arrow up and down.

The pedal should do the same thing as when you use the up and down arrow keys.

How to delete a set list

From the set list popup choose Configure

Press delete

Press the minus sign and press the delete button:

When prompted, confirm the deletion.

Another way

Choose Do>Manage files

Search for the set list

Verify that the file has a .stl extension (this is a set list)

Press Delete Found and confirm the deletion when asked.

Saving annotations in a PDF

Saving a file as PDF (even one with annotations created by Preview) will allow you to embed the annotations directly into the PDF.

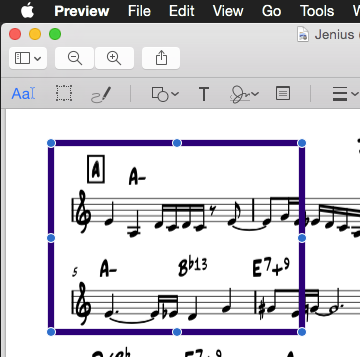
Run Preview and open a PDF that has annotations created by Preview.

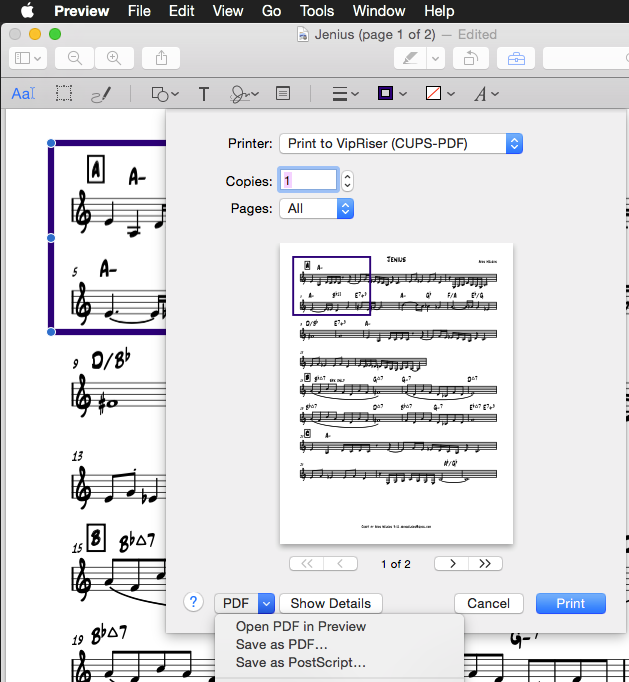
Now go to the File Menu and choose Print… and click on the PDF button on the bottom left and choose Save as PDF… Choose a destination and name your file. The annotations will be embedded in the PDF and readable by all programs.

If you have a large number of files and wish to automate the embedding of annotations in a PDF, try this:

These two programs will allow you to batch embed drawings directly into a PDF and rename the files quickly. Both can be run on large numbers of files.

Use VIPRiser to “print” a new PDF. Note you can batch print a number of PDFs all at once from the Finder. They can be saved in a folder (see vipriser preferences).

https://onflapp.github.io/blog/pages/Install-Virtual-Printer.html

VipRiser changes the names (adds characters before and after the .pdf). Use NameChanger to remove the leading characters and the extra .pdf on the end. Again, you can do this to a large number of files at once.

So basically print to VipRiser which will create new PDF files.
Then rename the PDF files back to their original names.

If you are on Windows, use Microsoft Print to PDF

https://www.digitalcitizen.life/print-pdf-windows-10

Slow/Large PDF files

This article will tell you how to make your super slow OR super large files work with unrealBook. This will make them smaller and faster to load.
This article assumes you are using a Macintosh.

If you have a Macintosh, try this small app I wrote (download then unzip, then run). Drag all your slow/large PDF files onto this app. It will prompt you for a destination folder, then it will process all the PDF files that were dragged onto the window. There will be some cases where the PDF might become larger (not many) but they will all turn well in unrealBook.

Here is the app download link.

If your iPad is an older one (iPad 2 or iPad mini first version), it will help immensely with page turns and will eliminate multiple pages being turned when one foot press was made.

You can also use smallPDF which is an online site. Excellent in making your PDF turn faster.

IOS16

I am always running unrealBook on the latest beta of iOS on my iPad. If there is a show stopping problem I will post on this website.

10-19-22 unrealBook runs on iOS16. Please update to the latest version.

9-12-22 The latest version runs on IOS16.

Version 4.38 runs on iOS16 beta 4 AFAIK. I am using it daily.

The notes below are with the unrealBook BETA

Beta 4 tested Airturn BT-105/Digit – everything works the same. Tested AirDirect mode – everything works. For most iPads except M1 iPads, the only difference in iOS16 is a bold font on the Lock Screen (and possibly more bugs)- really!!!! 8-4-22

Beta4 – unrealBook running fine again. If you are running beta 3, install beta 4! 7-29-22

Beta3 crashes unrealBook. This is an iOS bug. I have reported it. It may magically fix itself later.

Do not install iOS16 beta yet. I have been running fine since the first beta but I received a report that a newly installed version crashes. I am investigating this. 7-13-22

How things work – Bookmarks, indexes, TOC

Every now and then someone wants to know about how to handle their PDF files – specifically PDF books etc…. Let me try and explain….

For simple one song per PDF, there are no problems. You search for them by name, call them up and add them to set lists. There are no problems with this.

The problems occur when there are two or more songs in a PDF. The user wants to access the songs as if they were individual songs.

The biggest problem is that the PDF file usually has absolutely no info about what it contains.

Some people say – why not do a text search? This doesn’t work for a large majority of PDF files. They are images and don’t contain text.

There are several ways unrealBook tries to help:

Bookmarks: Creating a bookmark will make a file that “points” to a page in a PDF. You can search for these bookmarks and add them to set lists just like any other file. The disadvantage is that you need to create a bookmark for every song you have.

Table of Contents (TOC) in a file via the Go Menu: This works for dialing up songs in a PDF. The advantage is that it’s built into the PDF. The disadvantage is that hardly any PDFs have a table of contents in them. You can create your own Table of Contents using an app like PDFOutliner. BTW: Table of Contents are also called “Outlines” in PDF speak. As of unrealBook 1.93 you can create an index from the table of contents.

Indexes: This is the ultimate solution for being able to dial up any song in a PDF. Index files (.csv) allow you to create a file that describes a PDF book in a way that you can call up songs by a user-defined name and easily add them to set lists. In addition, you can reference ANY PDF in an index. You can make your own custom lists that point to any file and page. Disadvantage is that you need to create this with a spreadsheet app but once you create it, it’s done and works great. Once an index (.csv file) has been created, copy it into the unrealBook documents folder like any other PDF and rebuild the All Indexes list by pulling down on it. The newly added index will appear in the various index lists.

Read about how to create an index.

Create index with Excel

Create index using the Index Editor

Basically there are 2 main ways to access songs; by filename or by index. That’s why you can call up All Indexes from the All Files menu.

In addition, Quick Find merges the two methods into one large list.

Here are some indexes for real books which are found on the internet. They may work right away. Some might need to be adjusted for your copy of the Real Book. Copy the files into your unrealBook documents folder like any other PDF.

http://diystompboxes.com/unrealbook/csvindexes/

Airturn PED Pedal info

CHANGING THE MODE

  1. Turn on the PED.
  2. Press and hold the MODE button. The red
    LED will flash once per second from 1 to 6
    flashes. The number of flashes corresponds
    to the same MODE number. Be sure to count the flashes.
  3. Release the MODE button following the number of flashes that reflects the desired MODE. The blue and red LEDs will flash together the number of times indicating which MODE has been set.

Example: To set MODE 2 hold the MODE button for 2 flashes of the red LED, release and both LEDS will flash 2 times to confirm the MODE 2 setting.

Note: Once the MODE has been set, it will remain the same until it is changed following the above steps.

Reset pairing:

Pairing must be reset whenever switching from one device to another or when switching between MODES 1 and 2.

With the PED powered on, press and hold the power button for six seconds. After two seconds, the PED will appear to power down. Continue to hold the power button. At six seconds both LEDs will blink three times. After the third blink release the power button. The device has been reset. Remove any old pairing from your host computer and then turn on the PED to pair again with the desired host computer.

PAIRING IN PED-APP-DIRECT MODE 1

Note: This MODE is for PED-APP-Direct apps only.

  1. Power on the PED.
  2. Be sure the PED is in MODE 1.
  3. Go to your app and find the Bluetooth setup screen.
  4. Find the PED in the device list and tap on it.
  5. Tap on the Pair option in the dialog box.

PAIRING IN MODE 2-6

Open your computer’s Bluetooth Setup dialog:

iOS – Select Settings>Bluetooth and turn on the Bluetooth if it is off. When the PED is discovered, it will appear in the list of devices. Tap on the selection. A dialog box will then appear. Tap on Pair.

Android – Select Settings>Bluetooth and turn it on if it is off. Make sure your device is set to discoverable. Then tap the SCAN button. When the PED appears, tap to pair.

PC – Select Control Panel, My Bluetooth Devices. Select “Add a device”. Click next and complete pairing.

MAC – Select Apple, System Preferences, Bluetooth and turn on Bluetooth. The PED will appear in the Devices window

Translate »